 868-BACK, the new Michael Brough adventure-strategy-roguelike, has been out for a week and a bit, and a lot of people have been enjoying it. As one of the playtesters of this marvellous game, I've had the chance to really understand many different levels of play inside it over the past two years. While I won't divulge the highest-level strategies, I wanted to give some tips to give you that first leg up if you're still finding the early servers intimidating, as well as a couple of more specific tips about certain unusual progs that may get you more enthusiastic about them.
Stockpile resources early
During the sleepy early sectors, in between picking vital progs, you should focus on grabbing as much resources from the floor as you can. This not only gives you a safety buffer in case something goes wrong later, but also gives you the flexibility to overspend on grabbing a high-value cube that appears early in sector 3 or 4 (such as a linkcube, or a high-power prog like .fork).
Grabbing an easy 1 or 2 data out in the open is OK, but there should be a decent amount of resources surrounding it to justify the use of a siphon. Resources should always be a high priority at this point in the server.
If nothing looks good in sector 1, hang on to your siphons
If there really isn't a lot of resources on the floor, there aren't any progs that work well with your devices, or there's a lot of cubes that can't be siphoned without triggering a big total alert (such as cubes that are all diagonally adjacent) then by all means, don't try and pick something just because it's right there - head to sector 2 and try your luck there. Just because the sector gives you siphons doesn't mean you have to use them immediately. Who knows, saving those siphons for later might allow you to set up a big .hack, or a use of .fork early in a tricky sector.
Of course, as per the previous point, you still need to get some resources by around sector 4, so don't be too much of a perfectionist for too long. Eventually, you have to take what you're given.
If a bad encounter depletes your resources, restock!
Things don't always go to plan: sometimes you find yourself having to resort to expensive progs like .select or .spam three or four times, or tempo progs like .trojan eight to ten times, just to survive one encounter. If this brings one or both of your currencies to single-digits before sector 8, don't hesitate to spend siphons on just replenishing these resources. Even on sector 6 or 7, giving up on juicy-looking cubes to regain safety is a very prudent strategy.
When you restock, try to balance your currency
When siphoning cells for resources, it's easy to think that more = better, but if you're not observant about how the server is generating each currency, you can end up with an imbalance. If you find yourself with a huge difference (over 20+) between volts (%) and creds (¢), or vice-versa, consider whether getting yet more of the bigger resource is really going to benefit you over trying to bring up the smaller resource.
 Fig. 1 - Even though this cell here would allow you to siphon
 ¢¢¢%%%%%%%%%, if your credits are in the single digits, siphoning the top-right corner to get ¢¢¢¢¢¢¢¢ is probably more beneficial.
Of course, if your prog costs aren't balanced either (see below) then getting the currency that feeds those costs is what you're going to have to do - but there's no guarantee that server resource and prog cost imbalances are going to continue aligning like this.
Choose progs that balance your use of each currency
This is practically the inverse of the above, but it bears keeping in mind: pay attention to the progs you've grabbed, and if there's an obvious disparity in their use of currencies, look for more progs that use the other currency, even if it doesn't gel with your current build. There's nothing more annoying than having 30 ¢ and 0 % because your progs all had % in their costs. Grab a .cull or a .reap, and use it even in less-than-optimal situations to save on volts.
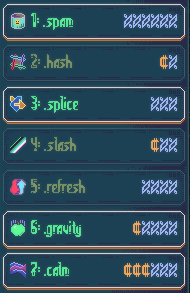 Fig. 2 - if your prog list starts to look like this, it's well past time to grab something, anything, that uses only
 ¢.
Choose progs based on the current powerup
Once you've gotten the hang of keeping your currency and prog costs in balance, you should take good notice of what powerups you're facing, and try to pick progs to play into the matchup. Unlike in 868-HACK, progs that are strong against current powerups don't have +1 alert level. While this makes things slightly easier, it also means good prog choices aren't obviously marked by the game, so you'll have to use your problem-solving lobes a lot more.
If you aren't sure where to start, here are just a few recommendations:
- virus motion improved!: this one exacerbates the issue of viruses sometimes being too diagonally positioned to hit, but too close to escape from their attack. I find leaving a
.flameand retreating can be great at stopping these viruses in their tracks. - super melee sprite!: against this one, you might be tempted to take
.poly, to morph away the sprites when they've got you in their sights. But I've often found that.polytoo frequently creates more sprites where once were none. I find using.refreshto nullify the powerup for 1 turn, and then shooting, works a lot better. - instant replay!: this one punishes you for using long resource-heavy combos like
.combo, or one-off scrip like_clear. But, note that it only triggers from killing tasks, not transmissions. Against a lot of tasks, try using.refreshfirst, then a prog that can target transmissions like.ambushor.hack. - vibe progging!: this one punishes you for choosing progs that can harm you if they activate at the wrong time, such as
.spliceor.pull. Try to stick to progs that are always beneficial when used, like.debug. or.scan. I think.calmis a particularly good option here. - polymorphing laser!: this one can make chokepoints very difficult to defend, with nearly any task capable of shooting a sprite laser, sliding through a wall, or using a virus attack unexpectedly. But, since the effect only applies to undamaged enemies, progs like
.selectcan be great at taking the edge off it, and progs like.scanor.cullcan help you avoid taking risky laser shots here and there. You can also take.indexto try and benefit from the frequently-shifting enemy types.
Hopefully, these can get you thinking about other progs that might be useful against other powerups out there.
Choose progs based on your current devs
Finally, your own devices are also very important when picking progs. The right prog can make a device sing in often unexpected ways, and a few devices in this game are balanced entirely around one specific prog. Because your devices stay with you across a game, being able to consistently recognise progs that work with them in a variety of situations is critical for long-term success.
A few recommendations for specific devices are as follows:
/hijack: for this one, it seems obvious that you want to hit sprites from afar, and are thinking mostly of.blit. But do you know what else works just as well with this?.select. You might also want to take.polyto try and reroll a sector with no sprites in it (within reason, of course)./setup: any prog that requires the player to be a very specific distance or direction from a task, like.trojan,.poke, or.swap, is going to benefit from this device. But other progs that can't be used on the same cells twice, like.flame,.crash, or even.bind, can also cause this dev to give you "free" moves. Consider pairing those with.loopand see what happens./boot: this gives you a credit discount on your first prog each sector, so you're probably hankering to use.selectwith this. But other progs that are great at the start of a sector and have at least¢¢¢in their cost, like.calmor.fork, are also well worth considering./patch-3: this one rewards you for having a very cheap prog in slot 3 of your list. Try and hold off from taking progs willy-nilly in the first few sectors until something really low-to-the-ground and relatively easy-to-use like.peek,.swapor.lagshows up. Or, if you can't find any, something that costs 2 resources but has a balanced cost - either.polyor.hack. Two other progs worth pairing with this in other slots are.combo(which naturally benefits from low-cost progs) and.select(which, when used in advance, can turn the random damage from the device into kills)./pirate: most of the time, you want to use this to get scrip from cheap progs, like.scanor.push, so future devices like/library,/harmonyor/codecan make use of them, or so you can trade them in shops. But what you can also do is grab.clear, then use it 8 times on single enemies. This lets you trade 8 data for 1 copy of_clear. If you do this in a low-multiplier server, like a x1, the cost in raw points is minimised, and you can (hopefully) unleash it in a much more valuable server later.
Of course, these are all early-game devices in the mundane and moderate tiers - many of the higher-tier devices like /spectrum or /magnet can get far more value out of their synergistic progs than these, so be sure to try new things when you obtain something rare instead of just relying on what's already tried and true.
Understand the difference between 4 alert, 5 alert and 6 alert
Plenty of basic utility progs like .peek and .scan have low alert levels, summoning only 2 or 3 tasks. You can fairly safely siphon these anytime (assuming other tasks aren't currently on your tail). However, once you get to cubes like .boost or .swap that summon 4, 5 or 6 tasks, you have to be much more discerning. The difference between 4 tasks and 5 tasks is significant - at 5, there's a much greater chance of getting flanked by tasks spawning behind you, of multiple tasks reaching you at the same time, and of fairly bad type combinations appearing (such as sprites protected by viruses, or glitches that flank you as daemons tank your hits). That one extra task makes a difference!
For that same reason, there's a sizable gap in danger between 5 tasks and 6 tasks. Generally, you'll only want to take on 6 alert if you're pretty well protected by a chokepoint, or if you have a good set of progs to defend yourself with. That being said, don't feel shy about taking that prog if you think it'll do you a lot of good afterward.
Try not to spend on progs or scrip if it's likely you don't need to
Now, frequently using progs to save on taking hits is a fundamental skill in this game - progs and currency are plentiful, but joy (HP) is scarce. But even so, you have to resist the urge to overspend unnecessarily, and stop whenever you feel you can let your basic attack handle things from here.
Sure, you could spend ¢¢ on .scan twice to instantly kill an adjacent virus before another task flanks you, but if you could just use it once and then safely take a turn shooting it normally for the kill, why not do that? Furthermore, some progs like .combo are able to eliminate all tasks by spending more to charge it - one more .swap would let .combo kill 7 instead of 6 - but often, destroying all but 2 or 3 tasks, instead of a full clear, is enough for you to deal with.
You can take hits if you're about to boost /bass anyway
This is a continuation of the previous point: if your basic attack can handle the situation without you taking a hit, let it do that - but if you can't avoid a hit without progs, you can sometimes just take the hit anyway.
When you're late in a server, have no more devs worth connecting, and /bass is the only choice you have for upcoming sectors, you can start thinking of your joy (HP) as a resource to selectively spend instead of currency. Consider a case where you're ready to leave the sector, are close to the port, but a glitch is flanking you. Why spend ¢¢ on .flame to try and get rid of it, when you could just take the hit, end the glitch, and let /bass top you up immediately after?
 Fig. 3: If you're about to leave the sector and have all your devs connected, just shoot downward to end glitch 2, take the hit from glitch 1, shoot it twice, and leave, and boost
 /bass.
Master the use of .fork to increase your siphons
.fork's cost may seem conservatively high - one siphon that could be spent stealing data, just to double yourself for the remainder of this sector? Sure, having two Hackers enhances many progs like .row and .dial, but still, the cost does seem extreme… if you only ever use your last siphon to pay for it. But the value proposition changes greatly if you have one siphon remaining after forking. Use it while forked, and both Hackers will siphon the floor. You've doubled your final siphon, so in effect, you've refunded the siphon cost of using .fork (minus the ¢¢¢¢¢, of course).
Fig. 4: 10 cells for the price of one siphon? That's a steal.
So you can see how .fork may actually be economically worthwhile - but that's not all! Consider what happens if you enter a sector with 1 siphon unused. Pick up the two siphons in the sector, use one on .fork, and now you have two left over. You can double both of them, and actually go siphon-positive - 4 uses for only 3 actual siphons. This is where .fork starts to look well worth its 6 alert. The only issue, of course, is finding room in the sector to use that many siphons without hitting cubes you don't want - but most of the time, you'll be able to get quite a haul out of it.
You can use .loop on just one prog
When you first see .loop, it looks like the sort of prog you want to use for big plays, such as turning 4 .dials into 8 in one dramatic button-press. But, you can also use it for small plays, even as small as doubling a single prog, and still get meaningful resource savings. One big example is .bind: binding a scrip usually costs a large amount of volts, but if there are two adjacent progcubes, you can .bind the least-expensive one, and then only pay ¢%%% (from .loop) to bind the second one immediately.
Furthermore, .loop can also be used to situationally save on credits by paying volts instead. Consider this: you have two daemons you want to detonate with .reap, but are running low on credits. What you can do is use one .reap, and then one .loop on the same turn to repeat the first .reap - paying ¢%%% instead of ¢¢¢¢. By doing so, you've managed to "convert" three spent volts into three spent credits. This also applies to .combo (paying ¢%%% instead of ¢¢¢%), and even .blit (paying ¢%%% instead of ¢¢¢) if you're really trying to make your credits last. Be on the lookout for ways in which strategic .loop use can help keep your resources balanced.
Grab expensive progs to turn further cubes of it into scrip
You can't siphon the same prog twice: when it's in your possession, any further copies of that prog become scripcubes, which give scrip when siphoned. You can use this to your advantage: if you can't find .bind anywhere, you can still potentially gain scrip of specific progs by hoping that they appear multiple times this server, and siphoning them the first time you see them.
Consider the prog .clear. You may not like using it in general, or have a reason to take it with your current prog selection, but even then, grabbing it anyway does have a considerable benefit: if another .clear appears later in this server - even as soon as the very next sector - then it will become _clear, a powerful scrip. Being able to take a scrip like that, and keep it in hand for a later server - or even just to use immediately - can be an outcome well worth angling for.
Other progs that are well worth siphoning just to get a chance of gaining scrip include .x, .fork, and the occasional "emergency-button" prog like .spam. Moreover, if you do find .bind later, sometimes siphoning a scripcube and fighting the alerted tasks can still save on volts compared to binding.
If the server gives you a difficult-to-use scrip above a better scrip, try to get rid of it
Each server gives you a scrip when you connect. Be sure to check whether that scrip has very specific conditions for use! _peek, for instance, requires a cryptog to exist to make use of it. If you've got a more useful scrip below it, like _boost, and you don't have or can't see any devices that can benefit from scrip like /harmony, you'll often want to get rid of that _peek by using it as soon as possible. You don't want to be flanked by sprites and viruses, with not a cryptog around, and be unable to access that _boost when you really need it.
Of course, if the scrip beneath it isn't likely to be too important, don't try and remove it just for the sake of it - you could still trade it in later, or find a dev that could make use of it.
Enough yacking - get hacking!
That's more than enough pointers for now - time for you to do some exploring on your own! There's still so much to learn about and figure out in this game, from the highest-tier devs to long-term strategy about which goals to pursue, when and why. I've had a great time balance-testing it and seeing it grow into what it is today, so I hope you'll keep hacking and digging up some of the treasure to be found in its possibility space.